

Imagine biting into a cloud of hazelnut creaminess, embraced by layers of crispy wafer and smooth chocolate. That, my friends, is the essence of a Kinder Bueno Dessert, and trust me, it’s even more divine than it sounds.
This isn’t just any dessert; it’s a symphony of textures and flavors that will transport you straight back to childhood, but with a sophisticated, grown-up twist. Get ready to unleash your inner pastry chef (or at least, fake it till you make it!) because this recipe is about to become your new obsession.
Here’s why you absolutely *need* to try this Kinder Bueno Dessert:
- It’s ridiculously easy to make, even if your baking skills are questionable (like mine, most days).
- The combination of crispy wafers, creamy filling, and rich chocolate is an absolute flavor explosion.
- Visually stunning, this dessert is guaranteed to impress your friends and family (or just yourself, no judgment).
- Perfect for any occasion, from a casual weeknight treat to a show-stopping centerpiece at your next gathering.
Ingredients for Kinder Bueno Dessert
Here’s what you’ll need to make this delicious dish:
The full ingredients list, including measurements, is provided in the recipe card directly below.
How to Make Kinder Bueno Dessert
Follow these simple steps to prepare this delicious dish:
Step 1: Prepare the Wafer Base
Line the bottom of a baking dish with wafers, creating a solid base. You may need to break some wafers to fit perfectly. Don’t worry about perfection; we’re going for delicious, not architectural marvels.
Step 2: Create the Hazelnut Cream Filling
In a bowl, whip the heavy cream with powdered sugar until stiff peaks form. Gently fold in the hazelnut spread until well combined. This is where the magic happens, so taste and adjust the sweetness if needed.
Step 3: Assemble the Layers
Spread the hazelnut cream filling evenly over the wafer base. Add another layer of wafers on top of the cream. Now we’re building a Kinder Bueno skyscraper, people!
Step 4: Melt the Chocolate
In separate bowls, melt the white and milk chocolate with a teaspoon of vegetable oil in each. You can use a microwave or a double boiler. Just don’t burn the chocolate, or you’ll be starting from scratch (trust me, I’ve been there).
Step 5: Drizzle and Decorate
Pour the melted milk chocolate over the top layer of wafers, spreading it evenly. Then, drizzle the melted white chocolate over the milk chocolate in a decorative pattern. Sprinkle with chopped hazelnuts. This is your chance to get creative!
Step 6: Chill and Serve
Refrigerate the dessert for at least 2 hours to allow the chocolate to set and the flavors to meld. Cut into squares and serve. Enjoy the blissful combination of textures and flavors!
Tips and Tricks for the Perfect Kinder Bueno Dessert
Let’s dive into some secret intel that will elevate your Kinder Bueno Dessert from “good” to “OMG, this is amazing!”
Choosing the Right Hazelnut Spread
Not all hazelnut spreads are created equal. Some are grainy, some are overly sweet, and some just taste… off. Look for a high-quality spread with a smooth texture and a pronounced hazelnut flavor. Ideally, the ingredient list should be short and sweet, with hazelnuts as one of the top ingredients. A little extra splurge here is worth it.
The Secret to Perfectly Melted Chocolate
Melting chocolate can be tricky, but fear not! The key is low and slow. If using a microwave, heat the chocolate in 30-second intervals, stirring in between, until just melted. Avoid overheating, as this can cause the chocolate to seize. A double boiler is another great option, providing gentle and even heat. And remember, a teaspoon of vegetable oil will keep your melted chocolate smooth and glossy.
Wafer Wisdom: To Soak or Not to Soak?
Some people like to lightly soak their wafers in milk or coffee before assembling the dessert. This softens them and adds a subtle flavor. However, be careful not to over-soak, or you’ll end up with a soggy mess. If you prefer a crisper dessert, skip the soaking altogether. I personally prefer the crunch, but hey, you do you!
Adding a Touch of Zest
Want to take your Kinder Bueno Dessert to the next level? Try adding a touch of citrus zest to the hazelnut cream filling. A little orange or lemon zest will brighten the flavors and add a sophisticated twist. Just a teaspoon or two will do the trick. Trust me; it’s a game-changer.
Making it Ahead
This dessert is perfect for making ahead of time. In fact, it tastes even better after chilling in the fridge for a few hours, as the flavors have time to meld together. You can assemble the entire dessert up to 24 hours in advance. Just be sure to cover it tightly to prevent it from drying out.
Variations on the Kinder Bueno Dessert Theme
Feeling adventurous? Let’s explore some exciting variations on the classic Kinder Bueno Dessert!
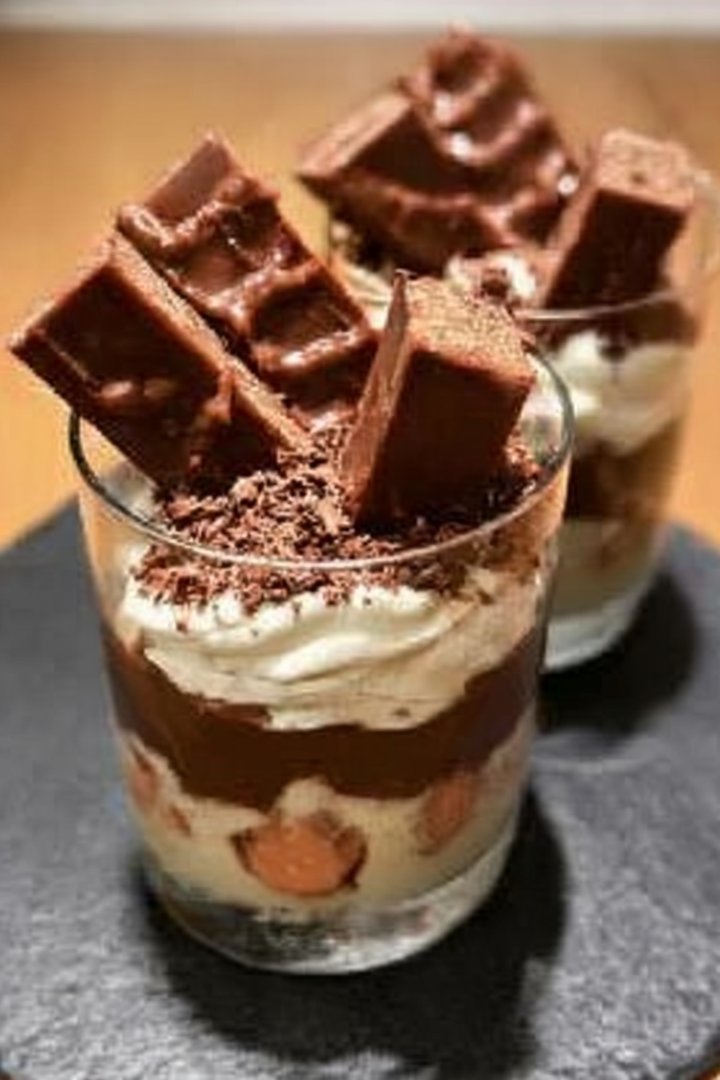
Kinder Bueno Dessert Parfaits
For a lighter and more elegant presentation, try layering the ingredients in individual glasses or parfaits. Start with a layer of crushed wafers, followed by a layer of hazelnut cream filling, and then a layer of melted chocolate. Repeat the layers until you reach the top of the glass. Garnish with chopped hazelnuts and a drizzle of melted chocolate. These parfaits are perfect for parties or special occasions.
Kinder Bueno Dessert Truffles
Transform your Kinder Bueno Dessert into bite-sized truffles! Simply combine the crushed wafers, hazelnut cream filling, and melted chocolate in a bowl. Mix well and then roll the mixture into small balls. Dip each truffle in melted chocolate and sprinkle with chopped hazelnuts. These truffles are a decadent and irresistible treat.
Kinder Bueno Dessert Ice Cream
Why not turn your favorite dessert into a frozen delight? Blend the hazelnut cream filling with some vanilla ice cream. Fold in crushed wafers and chopped hazelnuts. Freeze the mixture in an ice cream maker or a freezer-safe container. The result is a creamy and crunchy Kinder Bueno ice cream that is perfect for a hot summer day.
White Chocolate Kinder Bueno Dessert
For those who prefer white chocolate, this variation is a must-try. Simply replace the milk chocolate with white chocolate in the recipe. The result is a sweeter and creamier version of the classic Kinder Bueno Dessert. You can also add some white chocolate shavings to the hazelnut cream filling for an extra layer of flavor.
The Joy of Sharing (or Not!) Your Kinder Bueno Dessert
Let’s be honest, this Kinder Bueno Dessert is so good that you might be tempted to keep it all to yourself. And hey, no judgment here! We all deserve a little self-indulgence from time to time. But if you’re feeling generous (or if you have a really good friend), sharing this dessert is a surefire way to spread some joy.
Imagine the look on your loved ones’ faces when they take their first bite of this heavenly creation. The combination of textures and flavors is simply irresistible. And the best part is that you made it yourself! You’re basically a dessert wizard.
Whether you’re hosting a dinner party, celebrating a birthday, or just want to brighten someone’s day, this Kinder Bueno Dessert is the perfect choice. It’s easy to make, visually stunning, and utterly delicious. So go ahead, bake up a batch and share the love (or, you know, don’t. It’s your dessert, after all!).
Kinder Bueno Dessert : A Sweet Conclusion
So there you have it, folks! Everything you need to create your own Kinder Bueno Dessert masterpiece. It is easier than you think to create something truly delicious! From choosing the right ingredients to mastering the melting chocolate, you’re now equipped with all the knowledge to impress your friends, family, and (most importantly) yourself.
Remember, the key to a successful Kinder Bueno Dessert is to have fun and embrace the process. Don’t be afraid to experiment with different variations and put your own unique spin on the recipe. And most importantly, don’t forget to enjoy the delicious results!
Now go forth and bake, my friends! May your Kinder Bueno Dessert dreams come true!
Perfecting the Cooking Process
For the most harmonious culinary experience, tackle the components strategically. Begin by preparing the creamy hazelnut filling, letting it chill while you construct the base. Finally, assemble the individual elements just before serving to maintain optimal texture and prevent sogginess.
Add Your Touch
Unleash your inner pastry Picasso! Swap the classic hazelnuts for almonds or pecans. Incorporate a hint of orange zest into the chocolate ganache for a citrusy twist. Or, for an extra textural element, sprinkle toasted coconut flakes over the finished dessert.
Storing & Reheating
This Kinder Bueno Dessert is best enjoyed fresh, but leftovers can be stored in an airtight container in the refrigerator for up to two days. The texture may soften slightly, but the flavor will remain delightful. Reheating is not recommended.
- Chill the hazelnut cream thoroughly before assembling to ensure a firm and stable filling that holds its shape beautifully.
- When melting the chocolate, use a double boiler or microwave in short intervals, stirring frequently, to prevent burning and maintain a smooth consistency.
- Don’t skip the chilling steps! They are crucial for allowing the flavors to meld and the textures to set properly, resulting in a truly delightful dessert experience.
(Personal anecdote formated as paragraph subheading)
My niece once declared this dessert “better than the real thing!” That’s high praise coming from a kid obsessed with Kinder Buenos. It’s become a birthday party staple ever since.
Alright, buckle up buttercups, because we are diving headfirst into the delicious abyss that is a homemade “Kinder Bueno Dessert”. Yes, you heard that right. We’re taking that iconic chocolate bar and transforming it into a sophisticated dessert. Think of it as a glow-up, a culinary makeover, a… okay, I’ll stop with the analogies. But seriously, this is going to be good. Forget store-bought when you can whip up this masterpiece.
Why This Kinder Bueno Dessert Rocks (Besides the Obvious Chocolate Factor)
Let’s be honest, we all have a soft spot for Kinder Buenos. That crispy wafer, that smooth hazelnut cream, that delicate chocolate coating… it’s a symphony of textures and flavors. But this homemade version? It takes that symphony and turns it into a full-blown orchestra.
First off, you get to control the quality of ingredients. We’re talking real hazelnuts, good quality chocolate, and none of those mysterious additives that lurk in processed snacks. Secondly, you get the bragging rights of saying, “Oh, this? I just whipped it up.” Trust me; the impressed gasps will be music to your ears. This Kinder Bueno Dessert recipe is more than just a dessert, it’s a statement. It’s a declaration that you, my friend, are a culinary wizard.
The Key Ingredients for Kinder Bueno Bliss
Before we embark on this delicious adventure, let’s gather our supplies. Think of it as assembling your squad for a mission. This mission? To create the most epic Kinder Bueno Dessert the world has ever seen.
- **Hazelnuts:** These are the heart and soul of our Kinder Bueno Dessert. We’re going to toast them, grind them, and turn them into a luscious, creamy filling.
- **Chocolate:** Because, duh. Use a good quality milk chocolate for the coating and a slightly darker chocolate for the ganache (if you’re feeling fancy).
- **Wafers:** These provide that crucial crispy texture. You can find wafer sheets at most baking supply stores.
- **Butter and Sugar:** These are the backbone of most delicious things.
- **Fruit Juice:** A splash of this adds subtle flavor and replaces what alcohol can do for taste.
- **Carrageenan:** Our secret weapon for a smooth, non-animal derived gelling agent, holding everything together beautifully.
Assembling Your Kinder Bueno Dessert: A Step-by-Step Guide
Alright, it’s showtime! Put on your apron, crank up the music, and let’s get baking. This recipe might seem a little intimidating at first, but trust me, it’s totally doable. Just follow these steps, and you’ll be enjoying your homemade Kinder Bueno Dessert in no time. Remember, we use the best ingredients and avoid all the “no-no” items.
Roasting the Hazelnuts
Preheat your oven to 350°F (175°C). Spread the hazelnuts on a baking sheet and roast for about 10-12 minutes, or until the skins start to crack and they smell fragrant. Let them cool slightly, then rub them vigorously in a clean kitchen towel to remove the skins. This step is crucial for getting that intense hazelnut flavor. Nobody wants bitter hazelnut skins in their Kinder Bueno Dessert.
Crafting the Hazelnut Cream Filling
In a food processor, grind the toasted hazelnuts until they form a smooth paste. This might take a few minutes, so be patient. Add melted butter, powdered sugar, and a pinch of salt. Process until everything is well combined and you have a creamy, dreamy hazelnut filling. Set aside.
Wafer Wizardry
Carefully cut the wafer sheets into rectangles or squares, depending on your desired dessert shape. You can use a sharp knife or a pizza cutter for this. Be gentle, as the wafers can be fragile.
Building the Kinder Bueno Base
Spread a thin layer of the hazelnut cream filling onto one wafer rectangle. Top with another wafer rectangle, and then spread another layer of filling. Repeat as desired, creating a layered wafer and hazelnut cream masterpiece. Place the layered wafers in the freezer for about 30 minutes to firm up. This will make them easier to cut and dip in chocolate.
The Chocolate Dip: A Moment of Truth
Melt your good quality milk chocolate in a double boiler or in the microwave in short intervals, stirring frequently to prevent burning. Once the chocolate is melted and smooth, remove the chilled wafer stacks from the freezer and dip them completely in the chocolate. Place the dipped desserts on a parchment-lined baking sheet and let the chocolate set.
Adding the Ganache (Optional, But Highly Recommended)
If you’re feeling extra fancy, you can make a simple chocolate ganache by heating heavy cream and pouring it over finely chopped dark chocolate. Let it sit for a minute, then stir until smooth and glossy. Drizzle the ganache over the chocolate-covered desserts for an elegant finish.
Tips and Tricks for Kinder Bueno Dessert Perfection
Okay, so now you know how to make this Kinder Bueno Dessert. But I’m not going to leave you hanging without some insider tips and tricks to take your creation to the next level.
- **Toast those hazelnuts!** I cannot stress this enough. Toasting the hazelnuts is crucial for developing their flavor and adding depth to the filling. Don’t skip this step!
- **Don’t over-process the hazelnut filling.** You want it to be smooth and creamy, but if you over-process it, the oils will separate, and it will become greasy.
- **Chill, chill, chill!** Chilling the layered wafers before dipping them in chocolate will prevent the chocolate from melting and will make the dipping process much easier.
- **Get creative with your toppings!** Sprinkles, chopped nuts, sea salt… the possibilities are endless.
Kinder Bueno Dessert: Beyond the Bar
This recipe is more than just a copycat of a popular chocolate bar. It’s a starting point. It’s an invitation to get creative in the kitchen and experiment with different flavors and textures.
Think about adding a layer of caramelized white chocolate. Or incorporating a crunchy praline layer. Or even making a vegan version with plant-based chocolate and nut butter. The only limit is your imagination (and maybe your waistline).
Variations on the Theme: Kinder Bueno Dessert Adventures
Alright, let’s get those creative juices flowing. Here are some variations on the classic Kinder Bueno Dessert that will blow your mind:
- **Kinder Bueno Dessert Parfaits:** Layer crushed wafers, hazelnut cream, chocolate ganache, and whipped cream in a glass for a decadent parfait.
- **Kinder Bueno Dessert Truffles:** Roll the hazelnut cream into small balls, dip them in melted chocolate, and sprinkle with chopped hazelnuts.
- **Kinder Bueno Dessert Ice Cream:** Fold crushed wafers and hazelnut cream into your favorite vanilla ice cream base.
- **Mini Kinder Bueno Dessert Cakes:** Use small cake pans to create individual cakes filled with hazelnut cream and coated in chocolate ganache.
The Kinder Bueno Dessert: A Dessert for All Occasions
Whether you’re hosting a dinner party, celebrating a special occasion, or just craving a sweet treat, this Kinder Bueno Dessert is the perfect choice. It’s elegant, delicious, and guaranteed to impress.
So go ahead, grab your ingredients, and get baking. You deserve a little Kinder Bueno Dessert in your life. And who knows, maybe you’ll even create a new family favorite. Just remember to share the recipe (and the dessert) with your friends. Because good food is meant to be shared. Now, go forth and conquer the kitchen! The world needs your Kinder Bueno Dessert.
Frequently Asked Questions (FAQ) About Kinder Bueno Desserts
- **Can I make this dessert ahead of time?** Yes, you can prepare the hazelnut cream and the layered wafers ahead of time. Store them separately in the refrigerator and assemble the dessert just before serving.
- **Can I use a different type of chocolate?** Absolutely! Feel free to experiment with dark chocolate, white chocolate, or even a combination of both.
- **Where can I find wafer sheets?** You can find wafer sheets at most baking supply stores or online.
- **Is this recipe suitable for vegans?** No, this recipe contains butter. However, you can easily make a vegan version by using plant-based butter.
- **How long will the Kinder Bueno Dessert last?** The dessert is best enjoyed fresh, but leftovers can be stored in an airtight container in the refrigerator for up to two days.
This dessert is a labor of love, but the end result is absolutely worth it. Your friends and family will be amazed by your culinary skills, and you’ll have a delicious treat to enjoy. This dessert is also a great way to get creative in the kitchen.
Conclusion for Kinder Bueno Dessert
Das Kinder Bueno Dessert ist ein wahrer Gaumenschmaus, der in kürzester Zeit zubereitet ist und garantiert jedem schmeckt. Es vereint die cremige Füllung mit der knusprigen Waffel und dem zarten Schokoladenüberzug des beliebten Riegels zu einem unwiderstehlichen Dessert. Ob als schneller Nachtisch für den Alltag oder als Highlight auf der nächsten Party – dieses Dessert ist immer eine gute Wahl. Dank der einfachen Zubereitung und der Variationsmöglichkeiten kannst du es ganz nach deinem Geschmack anpassen und immer wieder neu entdecken.
Print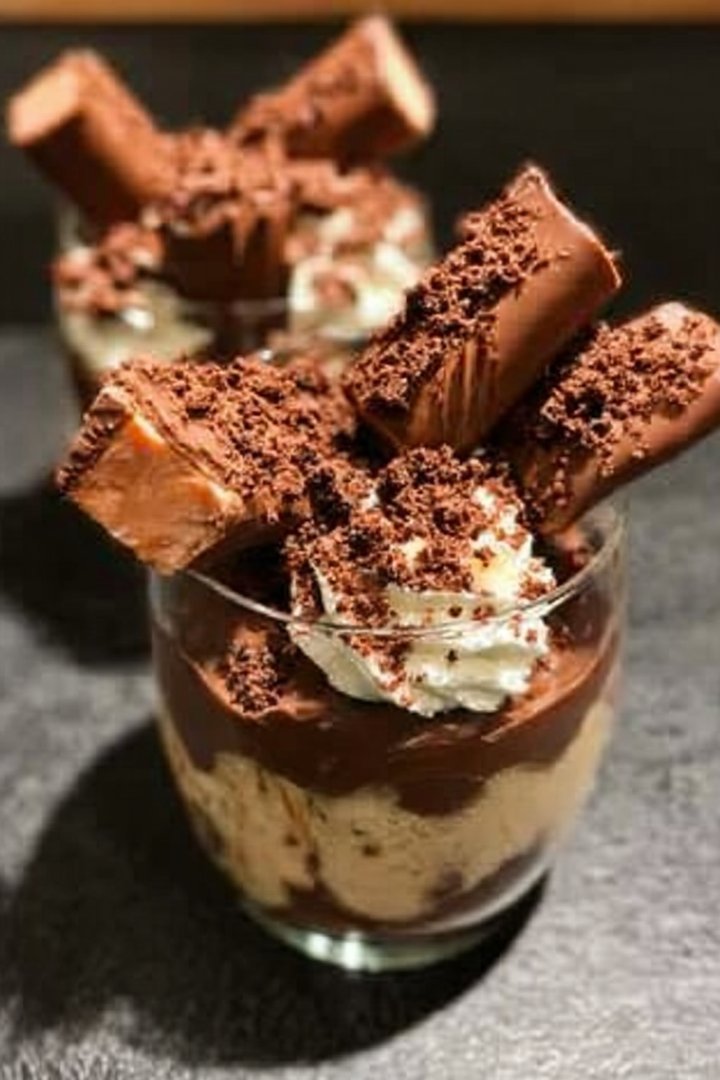
Kinder Bueno Dessert
Delicious kinder bueno dessert recipe with detailed instructions and nutritional information.
- Total Time: 35 minutes
- Yield: 4 servings 1x
Ingredients
- 250g Mascarpone
- 200ml Schlagsahne
- 50g Puderzucker
- 1 Päckchen Vanillezucker
- 10 Kinder Bueno Riegel
- 50g Haselnusscreme (z.B. Nutella)
- 50g geröstete Haselnüsse, gehackt
- Etwas Kakaopulver zum Bestäuben (optional)
Instructions
- Step 1: Die Mascarpone, Schlagsahne, Puderzucker und Vanillezucker in einer Schüssel mit einem Mixer steif schlagen.
- Step 2: 8 Kinder Bueno Riegel grob hacken. Die Hälfte davon unter die Mascarpone-Creme heben.
- Step 3: In Gläser oder eine Schüssel eine Schicht Creme geben, dann eine Schicht Haselnusscreme verteilen. Darauf eine Schicht der restlichen gehackten Kinder Bueno Stücke und gehackte Haselnüsse geben.
- Step 4: Wiederhole die Schichtung bis alle Zutaten verbraucht sind, wobei die letzte Schicht Creme sein sollte.
- Step 5: Die restlichen 2 Kinder Bueno Riegel in kleine Stücke schneiden und als Dekoration auf die oberste Schicht geben. Mit Kakaopulver bestäuben (optional).
- Step 6: Den Kinder Bueno Nachtisch für mindestens 30 Minuten im Kühlschrank kühlen, bevor er serviert wird.
Notes
- Im Kühlschrank hält sich das Dessert bis zu 2 Tage, aber die Bueno-Stückchen werden weicher.
- Zum Servieren kurz vor dem Verzehr mit etwas mehr gehackten Haselnüssen bestreuen, um den Crunch zu erhalten.
- Wenn die Creme zu fest ist, einen Schuss kalte Milch unterrühren, um sie wieder geschmeidiger zu machen.
- Für einen intensiveren Haselnussgeschmack die Haselnüsse vor dem Hacken kurz in einer trockenen Pfanne anrösten.
- Prep Time: 15 minutes
- Cook Time: 20 minutes
- Method: Stovetop
- Cuisine: American
FAQs
Kann ich das Kinder Bueno Dessert im Voraus zubereiten?
Absolut! Tatsächlich schmeckt es oft noch besser, wenn die Aromen Zeit zum Verschmelzen haben. Du kannst das Dessert problemlos einen Tag vorher zubereiten und im Kühlschrank aufbewahren. Stelle aber sicher, dass du es kurz vor dem Servieren mit den Bueno-Stücken garnierst, damit diese knusprig bleiben und nicht durchweichen. So vermeidest du enttäuschte Gesichter bei deinen Gästen, die sich auf den Crunch freuen. Eine gute Vorbereitung ist die halbe Miete, besonders wenn du Besuch erwartest und die Zeit knapp ist.
Kann ich andere Nüsse anstelle von Haselnüssen für mein Kinder Bueno Dessert verwenden?
Klar, sei kreativ! Wenn du keine Haselnüsse magst oder eine Nussallergie hast, kannst du problemlos Mandeln, Walnüsse oder Cashewnüsse verwenden. Jede Nuss bringt ihren eigenen Geschmack mit und verändert das Dessert auf eine interessante Art. Geröstete Nüsse verstärken das Aroma zusätzlich. Achte nur darauf, die Nüsse fein zu hacken, damit sie sich gut in die Creme einfügen. Denk daran: Kochen soll Spaß machen, also experimentiere ruhig!
Wie lagere ich das Kinder Bueno Dessert richtig?
Das fertige Dessert sollte im Kühlschrank aufbewahrt werden, um seine Frische und Konsistenz zu bewahren. Am besten deckst du es mit Frischhaltefolie ab oder lagerst es in einem luftdichten Behälter. So verhinderst du, dass es Gerüche aus dem Kühlschrank annimmt oder austrocknet. Im Kühlschrank hält sich das Kinder Bueno Dessert etwa 2-3 Tage. Danach könnte die Creme etwas an Konsistenz verlieren, aber es ist immer noch essbar.
Gibt es eine vegane Variante des Kinder Bueno Desserts?
Ja, absolut! Ersetze die Sahne und den Frischkäse durch vegane Alternativen auf Pflanzenbasis. Es gibt mittlerweile viele tolle vegane Sahne- und Frischkäseprodukte, die dem Original sehr nahekommen. Verwende vegane Schokolade und überprüfe, ob die Bueno-Alternativen, die du verwendest, ebenfalls vegan sind. Achte darauf, dass du pflanzliche Geliermittel verwendest, falls das Rezept Agar-Agar enthält. Mit ein paar kleinen Anpassungen kannst du ein köstliches und tierfreundliches Kinder Bueno Dessert zaubern!

Leave a Comment