

Gewürzgurken aus dem Steintopf von ritel, ein Geschmackserlebnis, das Kindheitserinnerungen weckt und die perfekte Balance zwischen Säure, Süße und Würze bietet. Ein knackiger Genuss, der auf keiner Brotzeitplatte fehlen darf.
Stellen Sie sich vor, wie die Sonne durch das Küchenfenster scheint, während Sie diese Gurken zubereiten – ein Akt purer Nostalgie und kulinarischer Freude. Jede Gurke ist ein kleines, selbstgemachtes Kunstwerk, das Ihre Geschmacksknospen verwöhnen wird.
Here are a few reasons why you’ll absolutely adore this recipe:
- Easy to prepare with simple ingredients, perfect for both beginners and experienced cooks looking to preserve fresh flavors.
- The flavor profile is a delightful mix of tangy, sweet, and spicy, making it a versatile accompaniment to any meal.
- Visually appealing with their vibrant green color and rustic charm, these pickles add a touch of homemade goodness to your table.
- Versatile enough to be enjoyed as a snack, side dish, or even as a crunchy addition to sandwiches and salads, these pickles are a must-have.
Ingredients for Gewürzgurken aus dem Steintopf von ritel
Here’s what you’ll need to make this delicious dish:
The full ingredients list, including measurements, is provided in the recipe card directly below.
How to Make Gewürzgurken aus dem Steintopf von ritel
Follow these simple steps to prepare this delicious dish:
Step 1: Gurken vorbereiten
Waschen Sie die Gurken gründlich und schneiden Sie die Enden ab. Wenn Sie möchten, können Sie die Gurken auch in Scheiben oder Stifte schneiden. Verwenden Sie ein scharfes Messer, um saubere Schnitte zu gewährleisten.
Step 2: Sud zubereiten
In einem großen Topf Essig, Zucker, Wasser, Senfsaat, Dill, Knoblauch, Pfefferkörner, Lorbeerblätter und optional eine Chilischote vermischen. Bringen Sie die Mischung unter Rühren zum Kochen, bis sich der Zucker vollständig aufgelöst hat.
Step 3: Gurken einlegen
Die Gurken in einen sauberen Steintopf oder große Gläser schichten. Achten Sie darauf, dass die Gurken nicht zu dicht gepackt sind, damit der Sud sie gleichmäßig bedecken kann.
Step 4: Sud über die Gurken gießen
Gießen Sie den heißen Sud über die Gurken, sodass sie vollständig bedeckt sind. Drücken Sie die Gurken gegebenenfalls leicht nach unten, um sicherzustellen, dass keine Luftblasen entstehen.
Step 5: Reifen lassen
Decken Sie den Steintopf oder die Gläser ab und lassen Sie die Gurken mindestens 2-3 Tage im Kühlschrank ziehen. Je länger sie ziehen, desto intensiver wird der Geschmack.
Step 6: Genießen
Nach der Reifezeit sind die Gewürzgurken aus dem Steintopf von ritel fertig zum Genießen. Servieren Sie sie als Beilage zu Brotzeiten, Gegrilltem oder einfach als knackigen Snack zwischendurch. Sie sind besonders lecker zu einem deftigen Abendessen oder als erfrischender Kontrast zu reichhaltigen Speisen.
Perfecting the Cooking Process

To master this recipe, efficient sequencing is key. First, prepare your brine and spices. Next, clean and prep your cucumbers. Pack them into your stone crock and pour the brine over them. Weight them down, and let the magic happen!
Add Your Touch
Feel free to experiment with flavors. Add a pinch of chili flakes for a little heat or some fresh dill for a herbal note. You can also try different types of vinegar for varied tanginess. Adjust the amount of spices to your personal preferences.
Storing & Reheating
These homemade treasures are best stored in the refrigerator in their brine. They will continue to ferment slowly, so check them periodically. No reheating is required; they’re perfect straight from the fridge, a crisp and refreshing delight!
Here are a few insider tips to make your **Gewürzgurken aus dem Steintopf von ritel** experience even better:
- Use cucumbers of uniform size to ensure even fermentation and consistent flavor throughout your batch of delicious pickles.
- Don’t skimp on the salt. It’s crucial for drawing out moisture and creating an environment unfriendly to unwanted bacteria.
- Be patient! Fermentation takes time, but the wait is absolutely worth it for that authentic, tangy taste of homemade pickles.
(Personal anecdote formated as paragraph subheading)
My grandma always said the secret was a well-seasoned crock and a little bit of love. Her pickles were legendary, and I hope these tips help you create your own legendary batch!
Okay, let’s dive headfirst into the delightful world of **Gewürzgurken aus dem Steintopf von ritel**. Now, before you start picturing yourself wrestling with rogue cucumbers and a grumpy stone crock, let me assure you, this isn’t nearly as intimidating as it sounds. Think of it as a culinary adventure, a chance to connect with simpler times, and, most importantly, a way to impress your friends with your pickle-making prowess. Trust me, you’ll be the talk of the town… or at least the neighborhood potluck.
The Allure of Homemade Pickles
Why bother making your own pickles when you can buy them at the store? Ah, my friend, that’s like asking why you’d bake your own bread instead of grabbing a loaf from the supermarket. Sure, the store-bought stuff is convenient, but it lacks that certain *je ne sais quoi*. Homemade pickles, especially **Gewürzgurken aus dem Steintopf von ritel**, are bursting with fresh, vibrant flavor that you just can’t find in a jar on the shelf. Plus, there’s the satisfaction of knowing exactly what went into them. No mysterious additives or preservatives, just pure, wholesome goodness. And let’s be honest, who doesn’t love a good DIY project that ends with delicious results?
Gathering Your Pickle-Making Arsenal
Before we embark on this pickling expedition, let’s make sure we have all the necessary supplies. Think of it as assembling your superhero team, but instead of capes and masks, we have cucumbers and spices.
- **The Stone Crock (the Star of the Show):** A traditional stone crock is ideal for fermentation. It provides a stable environment and helps maintain a consistent temperature. If you don’t have one, a large glass jar will work in a pinch, but the stone crock truly elevates the experience.
- **Fresh Cucumbers (the Freshness Factor):** Choose small to medium-sized cucumbers that are firm and free of blemishes. Pickling cucumbers are best, but any variety will do.
- **Pickling Salt (the Salty Savior):** This is crucial for drawing out moisture and creating a brine that inhibits unwanted bacteria. Don’t use table salt, as it contains iodine and anti-caking agents that can affect the flavor and texture of your pickles.
- **Vinegar (the Tangy Twist):** Distilled white vinegar or apple cider vinegar are both excellent choices.
- **Spices (the Flavorful Force):** This is where you can get creative! Dill seeds, mustard seeds, peppercorns, garlic, and bay leaves are all classic additions.
- **Water (the Foundation):** Use filtered water for the best results.
- **Weight (the Pressure Provider):** You’ll need something to keep the cucumbers submerged in the brine. A clean plate or a resealable plastic bag filled with water works well.
The Secret to a Perfect Brine
The brine is the heart and soul of any pickle recipe. It’s what gives the cucumbers their tangy, salty flavor and helps preserve them. The perfect brine is a delicate balance of salt, vinegar, and water.
Here’s a basic brine recipe to get you started:
- 4 cups water
- 1 cup vinegar
- 1/4 cup pickling salt
Bring the water, vinegar, and salt to a boil in a large pot. Stir until the salt is completely dissolved. Let the brine cool completely before pouring it over the cucumbers.
Spice It Up (But Not Too Much!)
Now for the fun part: adding your spices! This is where you can really personalize your **Gewürzgurken aus dem Steintopf von ritel**. Feel free to experiment with different combinations and amounts of spices to find your perfect flavor profile.
Here are a few ideas to get you started:
- **Classic Dill:** Add 2 tablespoons of dill seeds, 4 cloves of garlic (crushed), and 2 bay leaves to the brine.
- **Spicy Kick:** Add 1 teaspoon of red pepper flakes and 1/2 teaspoon of black peppercorns to the brine.
- **Sweet and Tangy:** Add 1/4 cup of sugar to the brine for a slightly sweeter pickle.
Remember, less is more when it comes to spices. You can always add more later, but you can’t take them out!
Packing Your Pickles
Once the brine is cool and your spices are ready, it’s time to pack your pickles. Wash and trim the ends of your cucumbers. Pack them tightly into the stone crock, layering them with your spices. Pour the cooled brine over the cucumbers, making sure they are completely submerged. Place your weight on top to keep the cucumbers under the brine.
The Waiting Game (Patience is a Virtue)
Now comes the hardest part: waiting. Fermentation takes time, but trust me, it’s worth it. Store the stone crock in a cool, dark place for at least 3 to 7 days. The longer you let them ferment, the more tangy and flavorful they will become.
Check the pickles daily and remove any scum that forms on the surface of the brine. After a few days, taste a pickle to see if it’s to your liking. If not, let them ferment for a few more days.
The Grand Finale
: Enjoying Your Pickles
Once your pickles have reached the desired level of tanginess, transfer them to jars and store them in the refrigerator. They will keep for several weeks. Enjoy your homemade **Gewürzgurken aus dem Steintopf von ritel** as a snack, a side dish, or a topping for your favorite sandwiches and burgers. You’ve earned it!
Troubleshooting Your Pickles
Sometimes, even with the best intentions, things can go wrong. Here are a few common pickle-making problems and how to fix them:
- **Soft Pickles:** This can be caused by using too little salt or vinegar, or by fermenting the pickles at too high a temperature. Make sure you are using the correct amount of pickling salt and vinegar, and store the stone crock in a cool place.
- **Mushy Pickles:** This can be caused by using overripe cucumbers or by fermenting the pickles for too long. Use firm, fresh cucumbers and check the pickles frequently during fermentation.
- **Bitter Pickles:** This can be caused by using too much spice or by fermenting the pickles for too long. Use spices sparingly and check the pickles frequently during fermentation.
Beyond the Basics
: Pickle Variations
Once you’ve mastered the basic **Gewürzgurken aus dem Steintopf von ritel** recipe, the possibilities are endless! Here are a few ideas for variations:
- **Garlic Dill Pickles:** Add extra garlic and dill to the brine for a classic flavor combination.
- **Spicy Pickles:** Add chili peppers or hot sauce to the brine for a fiery kick.
- **Sweet Pickles:** Add sugar or honey to the brine for a sweeter pickle.
- **Bread and Butter Pickles:** Slice the cucumbers and add sugar, turmeric, and mustard seeds to the brine for a sweet and tangy pickle.
Don’t be afraid to experiment and create your own unique pickle recipes!
Now go forth and pickle! Your taste buds (and your friends) will thank you. And remember, even if your first batch isn’t perfect, don’t give up. Pickling is a skill that improves with practice. Happy pickling!
Conclusion for Gewürzgurken aus dem Steintopf von ritel:
Die Gewürzgurken aus dem Steintopf von ritel sind mehr als nur ein Snack; sie sind ein Stück Tradition und Handwerkskunst. Ihr einzigartiger Geschmack, der durch die Fermentation im Steintopf entsteht, macht sie zu etwas Besonderem. Ob als Beilage, Snack oder Zutat – sie peppen jedes Gericht auf. Auch wenn sie vielleicht nicht überall erhältlich sind, lohnt sich die Suche nach diesen knackigen Köstlichkeiten allemal. Genieße den authentischen Geschmack und lass dich von der Qualität überzeugen. Ein Muss für jeden Gurkenliebhaber!
Print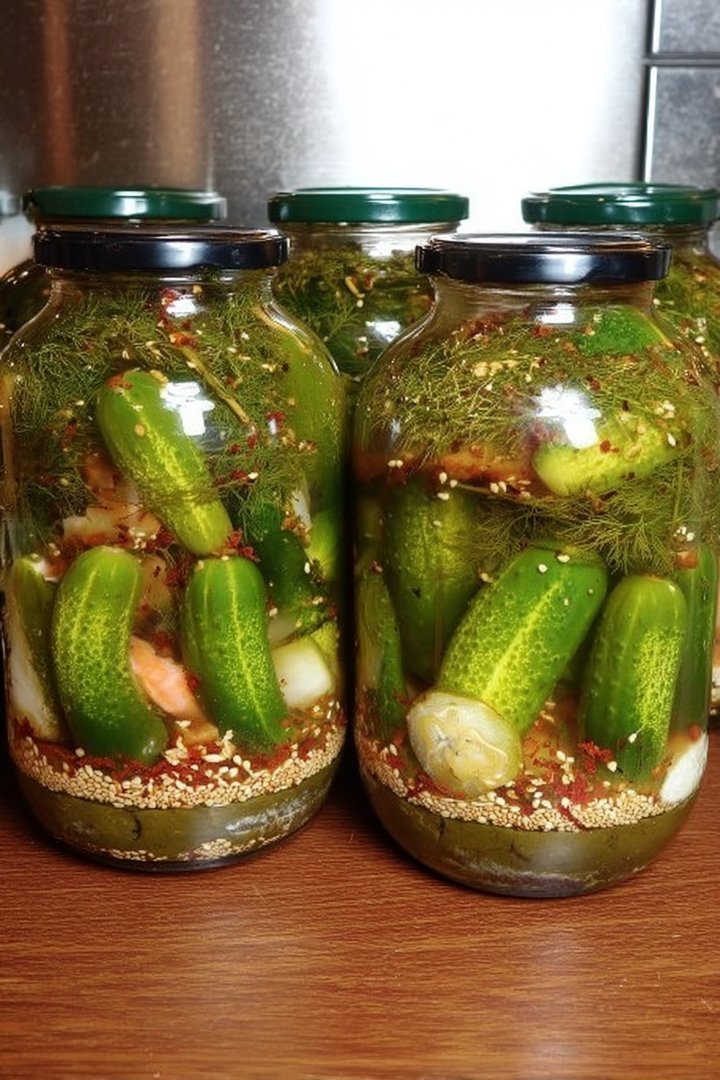
Gewürzgurken aus dem Steintopf von ritel
Delicious gewürzgurken aus dem steintopf von ritel recipe with detailed instructions and nutritional information.
- Total Time: 35 minutes
- Yield: 4 servings
Ingredients
- Kleine, feste Gurken: 1 kg
- Wasser: 1 Liter
- Essig (5% Säure): 250 ml
- Salz: 60 g
- Zucker: 30 g
- Senfkörner: 1 EL
- Dill (frisch oder getrocknet): 2-3 Stängel oder 1 EL
- Knoblauchzehen: 2-3
Instructions
- Step 1: Die Gurken waschen und gut abtrocknen. Beschädigte oder weiche Gurken aussortieren.
- Step 2: Das Wasser, den Essig, das Salz und den Zucker in einem Topf zum Kochen bringen. Rühren, bis sich Salz und Zucker vollständig aufgelöst haben. Die Mischung abkühlen lassen.
- Step 3: Den Steintopf gründlich reinigen. Senfkörner, Dill und Knoblauchzehen (geschält und leicht angedrückt) auf den Boden des Steintopfes geben.
- Step 4: Die Gurken dicht in den Steintopf schichten.
- Step 5: Den abgekühlten Essigsud über die Gurken gießen, sodass sie vollständig bedeckt sind. Bei Bedarf mit etwas Wasser auffüllen.
- Step 6: Die Gurken mit einem Teller oder einem sauberen Stein beschweren, sodass sie unter der Flüssigkeit bleiben. Den Steintopf an einem kühlen, dunklen Ort (z.B. Keller) für mindestens 2-3 Wochen lagern. Die Gewürzgurken sind umso besser, je länger sie ziehen.
Notes
- Gewürzgurken am besten im Steintopf im Kühlschrank aufbewahren, sobald er geöffnet wurde, um die Knackigkeit zu erhalten.
- Diese Gewürzgurken werden nicht erhitzt, sondern kalt als erfrischender Snack oder Beilage serviert.
- Serviere die Gewürzgurken zu Brotzeiten, Gegrilltem oder als erfrischende Beilage zu Kartoffelsalat.
- Für intensiveren Geschmack die Knoblauchzehen vor dem Einlegen leicht anritzen, damit sie ihr Aroma besser abgeben.
- Prep Time: 15 minutes
- Cook Time: 20 minutes
- Method: Stovetop
- Cuisine: American
FAQs:
Warum sind Gewürzgurken aus dem Steintopf von ritel so besonders?
Die Gewürzgurken aus dem Steintopf von ritel sind etwas ganz Besonderes, weil sie nach einem alten Familienrezept hergestellt werden. Stell dir vor: Knackige Gurken, sonnengereift und voller Geschmack, die in einem Steintopf langsam fermentieren. Diese traditionelle Methode verleiht den Gurken ihren unverwechselbaren, leicht säuerlichen und unglaublich aromatischen Geschmack. Keine Massenproduktion, sondern echte Handwerkskunst, die man bei jedem Bissen schmeckt. Der Steintopf sorgt für eine natürliche Umgebung, in der sich die Aromen voll entfalten können. Einfach unwiderstehlich und ein wahrer Gaumenschmaus für jeden Gurkenliebhaber!
Wie lange sind Gewürzgurken aus dem Steintopf von ritel haltbar?
Die Haltbarkeit der Gewürzgurken aus dem Steintopf von ritel hängt stark von der Lagerung ab. Ungeöffnet halten sie sich in der Regel sehr lange, oft mehrere Monate, wenn sie kühl und dunkel gelagert werden. Nach dem Öffnen solltest du sie im Kühlschrank aufbewahren und innerhalb von ein bis zwei Wochen verzehren. Achte darauf, dass die Gurken immer mit ausreichend Gurkenflüssigkeit bedeckt sind, um ihre Knackigkeit und ihren Geschmack zu bewahren. Wenn du Anzeichen von Verderb wie Schimmel oder einen ungewöhnlichen Geruch feststellst, solltest du sie lieber entsorgen. So kannst du den vollen Geschmack der Gurken genießen!
Was passt gut zu Gewürzgurken aus dem Steintopf von ritel?
Gewürzgurken aus dem Steintopf von ritel sind unglaublich vielseitig und passen zu unzähligen Gerichten! Denk an ein herzhaftes Vesper mit frischem Brot, Käse und Wurst (wie etwa Hühnerbrustaufschnitt). Sie sind aber auch eine tolle Beilage zu Gegrilltem, Salaten oder einfach pur als knackiger Snack zwischendurch. Hast du schon mal versucht, sie klein geschnitten in einen Kartoffelsalat zu geben? Ein Gedicht! Auch zu Burgern oder Sandwiches sind sie eine perfekte Ergänzung. Kurz gesagt: Gewürzgurken aus dem Steintopf von ritel sind ein echter Allrounder in der Küche und verleihen jedem Gericht das gewisse Etwas.
Wo kann ich Gewürzgurken aus dem Steintopf von ritel kaufen?
Die Gewürzgurken aus dem Steintopf von ritel sind leider nicht im Supermarkt um die Ecke erhältlich. Du findest sie am ehesten auf regionalen Bauernmärkten, in Feinkostläden oder direkt beim Hersteller, falls ritel einen Direktverkauf anbietet. Eine weitere gute Option ist die Suche im Internet. Viele kleine Manufakturen bieten ihre Produkte mittlerweile online an. Gib einfach “Gewürzgurken aus dem Steintopf von ritel” in deine Suchmaschine ein und schau, was dabei herauskommt. Vielleicht entdeckst du ja einen Onlineshop, der dir diese Köstlichkeit direkt nach Hause liefert! Viel Glück bei der Suche!


Leave a Comment